Welcome To
MyJonBoat.com
"How To" eBooks
*Online Since 1998
Browse Our Site:
Jon Boat Videos
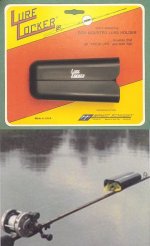
LURE LOCKERS: 
Podcast
From Ray
About
The
Jon Boat To Bass Boat Book
Mouse Over Links For Info
Jon Boat "Hall Of Fame"
A Tackle Accessory
You Won't Find
Anywhere Else!
|
You'll Save BIG On A Custom Bass Boat
In More Ways Than One |
Welcome To 18 Year Old Chris Salter's Page!
Photos detail this conversion in the "Jon Boat To Bass Boat" book!
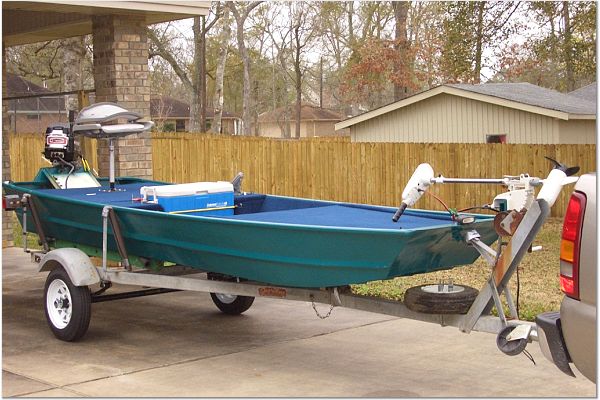


What Chris Says About His Boat
The transom mount for the outboard is a solid piece of aluminum that was just welded onto the aft of the boat and the motor just screw clamps on to it. The mount for the trolling motor is the same, aluminum block welded to the front with the trolling motor just screw clamping onto the front.
Carpet
The carpet is a marine grade carpet that was bought in a kit from Bass Pro Shop that came with a 21'x8' piece of carpet and three pints of marine grade glue.
Wiring
The wiring strips are what I would call a terminal, or distribution block, but I actually found those in one of my Dad's many jars of miscellaneous junk. I'm sure that they could be bought from a hardware supply store. I would highly recommend them because they do make the wiring job go a whole lot easier.
An interesting thing about the way I wired the boat is the only wires I ran in the boat were positive leads. I sanded the paint down to bare aluminum and screwed the negative battery lead into the boat itself. Then I simply wired the negative leads for my accessories into the boat. It saved a lot of wire and once again, simplified the whole process.
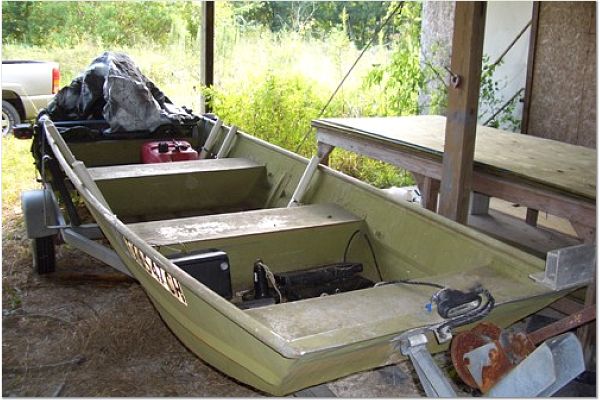
Live Well
The live well clips you see in the pictures are clipped onto two bolts going through the 3/4" plywood, one with a negative lead attached through the boat and the other with a wire connecting it to a switch and finally to the positive battery terminal. That allows me to clamp the wires on when needed, but not have to have the pump running unless needed.
Repair
About the repair on the rivets on the bottom of the boat. Since the boat is over thirty years old there were some thin spots towards the front of the boat, so I had a friend weld on those three plates of aluminum. After that I took the boat into a dark shed and showed a flashlight through one side of the boat and looked on the other side for and pin holes. these I circled. After I found all of the tiny holes I used clear silicone and filled in the holes and covered each rivet to ensure that it didn't leak. I also went along all of the welds which held on the transom plate and covered and filled them with silicone. The downside to the silicone was that paint would not adhere and stick very well to it, but I decided it would be okay because all of the rivets were on the bottom of the boat and nobody really looks down there.
Paint
I used a special self-etching aluminum spray paint primer that I bought from O'riley's Auto-parts. I put a good two coats on the boat and it was ready for paint. I used a paint booth to do the boat. The paint I found on eBay, but it's a brand name marine grade paint called Dolphinite. I just used a gallons worth and managed to put three coats of paint over the entire boat using a wagner power painter and had enough left over for minor touch ups whenever it's needed. I figured the marine grade paint would be more than perfect for our water around here, which is just a little brackish, but mostly fresh.
Trailer
We're going to ad a couple more things to the boat before we call it finished. Like I already told you we put a new axle, wheels, and bearings on the trailer. We're going to put new runners and brackets for the runners on the trailer with another winch. The only thing we have left for the boat is adding another seat on the front deck and we're going to add a cover in the back of the boat to keep the wires more out of the weather. design.
and a great addition to the "Jon Boat To Bass Boat" Book!
Magness Enterprises
23853 C.R. 114
Iola, Texas 77861
1-877-968-6878
Website Design By
Magness Enterprises
Home
-
About This Jon Boat
-
Conversion Cost -
eBook Download Info
-
eBook CD Info
Printed Book+CD Info
-
Jon Boat Accessories
-
Lure Lockers On Video
Emu Oil For Sunburn -
Jon Boat Links & More
-
Prices
& Extras Info
V-Bottom Jon Boats
-
Customer Kudos
-
Bassin' Buddies e-Greet
Order
-
Free Preview eBook
Info
-
Jon Boat Hall Of Fame
Used Jon Boats -
Aluminum Jon Boats -
Jon Fishing Boat
About Us - Privacy - Tackle
- Jon Boat Videos -
Site
Map